All my friends know the yumminess of sio pao. It is a very time consuming dish but the delicious results are worth it! JJ this is mainly for you. Nikki and Mei Mei can now make them without me so obviously I will no longer be needed. :-P
Filling:
5 pounds pork loin roast
water
1 onion
garlic salt
pepper
3 cups stock (liquid from the crock pot)
6 Tbsp Filipino soy sauce
3 Tbsp rice vinegar
2/3 cups light brown sugar
2 1/2 Tbsp cornstarch dissolved in 1/2 cup water
1 onion, minced usually ends up being a little more than a cup
4 tsp minced garlic
2-3 Tbsp cooking oil
The first part of this is real easy. Season the pork loin with salt and pepper and place in a crock pot. Cut the onion however you see fit, I like to cut mine in sixths. Cover the roast almost half way with water if you're over that's fine. Set the crock pot on Low for 8 hours. Shred it and discard the fat.
I went through a lot of pain staking tediousness to get the measurements for a friend, JJ. Every time I make sio pao I promise I'll get the measurements and then I forget. Like most of "grandma's" recipes the measurements are not exact, so I worked hard to get the measurements as close as possible. You may need to tweak it a little.
1) Heat a large skillet on medium heat and cook the garlic and onions until they are clear. DO NOT brown them because it changes the taste of the filling.
2) Add the shredded pork and heat through, this shouldn't take too long.
3) Add the stock, soy sauce, and vinegar and bring to a boil. Once it boils crumble the brown sugar on top and mix well.
4) Stir the cornstarch mixture before adding it to the pork. Mix thoroughly and bring to a boil until the liquid has thicken. You may need to add more or less depending on where you are at. I usually dissolve 5 Tbsp cornstarch in a cup of water and add until a little at a time until the sauce has thickened. Now let the meat cool because it will reabsorb the juice/liquid/sauce.
Dough:
I have been asked by others if I can substitute things to make this gluten free, wheat free, egg free, sugar free, etc. You can't. I've tried making this several ways and it never comes out right. This is also a half recipe, very few people I know have a mixer big enough to make a full batch.
**** Before I start I usually heat my oven to 100 degrees Fahrenheit and then I turn it off. The result is a very warm draft free place to let my dough proof. My oven cools fairly quick if yours maintains heat warm it to about 85 degrees and shut it off*******
5 tsp dry yeast
2 1/2 cups warm water (105-110 degrees)
1/2 cup white sugar
3/4 cup Crisco or vegetable shortening
1/2 tsp salt
1 egg
5-10 cups of flour (It depends on humidity. When I made the first batch it took 6 cups but for my second batch I used almost 10.)
1) Dissolve the yeast with 2 1/2 cups of water and 1/2 cup sugar. Mix well and set aside until bubbley. I wish I had the forethought to take a photo before I added the Crisco.
2) Slowly mix in the Crisco, salt, and egg on low. Using a dough hook gradually add the flour a cup at a time until the dough is no longer sticky and starts to form a ball.
3) Divide the dough into 2 parts and place them in large bowls draped with a damp paper towel. Let them proof for 30 minutes in a warm draft free area.
From there I punch down the dough and lightly roll it around while still inside the bowl. I really don't want to over work it.
Measure about 1/4 cup of dough and roll it into a ball in your hands. It may be sticky at first but once you've worked it, it should no longer be sticky.
Stretch out the dough, leaving the middle part thicker than the outer edges.
Spoon the meat mixture onto the middle of the dough. I can get a little more than 1/3 cup and still close it. Start off with less if you are not familiar with making steamed buns, about 2 1/2 Tbsp and work your way up.
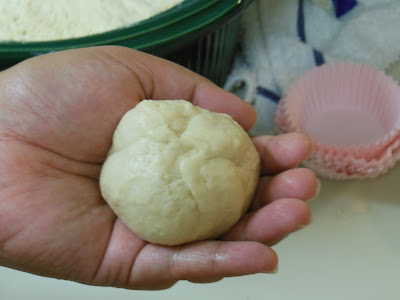
Fold the edges over and pinch to seal. Once it is sealed roll the dough in your hands to reform a ball. Don't be to forceful or the filling will come out.
Place the bun on a cupcake liner and set on a plate, tray, or another area. You can let them proof if you'd like but I place mine in the steamer when I'm done with them and cook them. Steam the buns for 18 minutes they will poof up. Now do not be upset if they are pretty and round and poofy and when you move them they deflate and look yucky. It happens from the drastic change in temp and it depends if the steamer has too much water condensation. It will still taste great.
Here is a super sized sio pao for one of my boys! Love this kid he is like a little brother and he is so funny, too!!!
He didn't know how to smile because he took too big of a bite!
Good luck and don't be afraid to ask any questions! I'm still looking for feed back about a give away. Leave a comment if you are interested in free bento stuff.


